
- Why Drip Edge Is Important for Your Roof
- Understanding Roofs with a Complex Series of Gables
- Tools and Materials Needed for Drip Edge Installation
- Step-by-Step Guide to Installing Drip Edge on Gable Roofs
- Real-Life Case Study: Successful Drip Edge Installation on a Complex Roof
Why Drip Edge Is Important for Your Roof
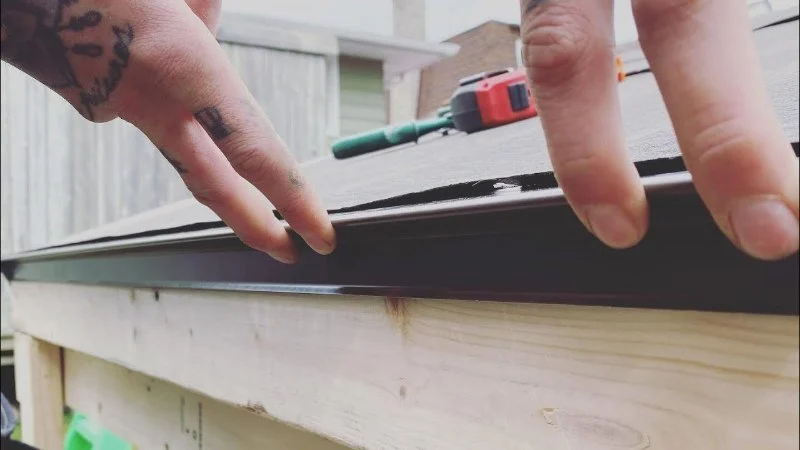
Drip edge is a crucial component of your roofing system, especially when dealing with a roof that has a complex series of gables. It serves as a metal strip installed along the edges of the roof to guide water away from the underlying structure, preventing damage from water runoff. Without proper drip edge installation, water can seep under the shingles, leading to rot, mold, and costly repairs over time.
For roofs with multiple gables, which tend to have intricate edges and angles, a drip edge is even more important to ensure proper drainage. It helps protect the roof's fascia and prevents water from damaging the roof’s structure and the home's exterior. Installing drip edge is a relatively simple and affordable way to extend the lifespan of your roof.

Gunner Roofing / gunner roofing
CromwellLower Connecticut River Valley Planning RegionConnecticut
700 Corporate Row, Cromwell, CT 06416, USA
Understanding Roofs with a Complex Series of Gables
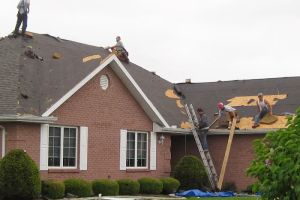
Gables are the triangular sections of a roof that extend from the peak to the eaves, often forming the distinctive shape of many traditional homes. A roof with multiple gables—often referred to as a complex gable roof—can be challenging when it comes to installation and maintenance. These roofs may have several ridges, valleys, and corners that require careful attention to ensure proper water runoff.
The complexity of these roof types means that every edge and intersection must be properly sealed, and the installation of components like drip edge becomes critical to maintaining the roof's functionality. If the drip edge is installed incorrectly or not at all, water can pool in certain areas or be directed toward the structure, causing damage over time.
Lance Roofing & Siding Inc. / lance roofing and siding
6903 Dayton Springfield Rd, Enon, OH 45323, USA
Tools and Materials Needed for Drip Edge Installation
Before beginning the installation of drip edge on your roof, it’s essential to gather the proper tools and materials. Here's what you'll need:
1. Drip Edge Material
The drip edge is typically made of aluminum, steel, or copper. Aluminum is the most common choice because it is lightweight, durable, and resistant to rust. Make sure to choose the right size and color to match your roof and aesthetic preferences.
2. Measuring Tape
Accurate measurements are essential to ensure that the drip edge fits properly around the roof's edges. A good-quality measuring tape will help you get precise measurements for each section of the roof.
3. Tin Snips
Tin snips are used to cut the drip edge to the correct lengths. Make sure to use heavy-duty snips to ensure clean cuts without damaging the material.
4. Hammer and Nails
You will need a hammer or a nail gun to attach the drip edge securely to the roof. Galvanized roofing nails are recommended because they are resistant to rust and corrosion.
5. Safety Gear
As with any roofing project, safety is paramount. Wear appropriate gear, including gloves, a helmet, and non-slip shoes, to ensure your safety while working at height.
Step-by-Step Guide to Installing Drip Edge on Gable Roofs
Now that you're ready with the right tools and materials, follow these steps to install drip edge on your roof with a complex series of gables:
1. Measure the Roof Edges
Start by measuring the length of the roof edges where the drip edge will be installed. Use the measuring tape to determine how much drip edge material you will need. Make sure to measure each gable section individually to account for any variations in length.
2. Cut the Drip Edge to Size
Using your tin snips, cut the drip edge material to the required lengths. For complex gable roofs, you may need to make precise cuts at the intersections of different gable sections to ensure a snug fit.
3. Install the Drip Edge on the Eaves
Begin installing the drip edge at the eaves of the roof. Start at one end and work your way across the roof, making sure the edge of the drip edge hangs slightly over the fascia. Secure the drip edge with galvanized nails, placing them every 12 inches along the edge.
4. Work Around the Gables
As you move toward the gables, you’ll need to make cuts that allow the drip edge to fit around the corners of the roof. This can be tricky with multiple gables, so be sure to take accurate measurements and make cuts that align with the roof’s angles. Make sure the drip edge continues to overhang the edge of the roof to direct water away from the fascia.
5. Secure the Drip Edge at the Gable Ends
Once you’ve positioned the drip edge around the gables, secure the ends with nails. Make sure the seams where two pieces of drip edge meet are tight, and there are no gaps where water could potentially seep through.
6. Inspect and Finalize the Installation
Once the drip edge is installed, take the time to inspect the entire roof. Ensure that the edges are properly secured, there are no loose nails, and the water flow is directed away from the roof structure. Double-check that the drip edge is flush against the roof and that it is properly aligned with the roof's gables and edges.
Real-Life Case Study: Successful Drip Edge Installation on a Complex Roof
Let’s take the example of a homeowner, Tom, who decided to install a drip edge on his roof with multiple gables. His roof had many ridges and valleys, making the installation process more complex. Tom started by measuring the roof carefully, cutting the drip edge, and installing it section by section, paying close attention to the angles and intersections of the gables.
Throughout the process, he encountered a few tricky corners where the drip edge needed to be custom-cut to fit the shape of the roof. However, with patience and attention to detail, Tom was able to install the drip edge correctly, ensuring that water would flow away from his roof and fascia. After completing the project, Tom noticed that the roof’s protection against water runoff had improved, preventing potential water damage to the home’s exterior.
Tom’s successful installation shows that, with the right tools, patience, and a step-by-step approach, installing a drip edge on a roof with multiple gables can be a manageable and effective way to enhance the durability and protection of your roof.
If you're ready to take on your roofing project or need expert guidance and materials, visit Pro Found Roofing for the best products and services tailored to your roofing needs.


 Trinity Metal Roofing5.0 (40 reviews)
 Quality Exteriors5.0 (355 reviews)
 All Type Roofing, Inc.5.0 (1 reviews)
 Smith Home Improvements0.0 (0 reviews)
 True Roofing & Construction5.0 (33 reviews)
 LaFon Custom Sheet Metal Roofing, LLC. CCC 13292055.0 (2 reviews)
 How to Finance a New Roof Without Breaking the Bank
 How to Choose the Best Roofing Contractor: 10 Essential Questions You Must Ask
 Does a New Roof Increase Your Home's Resale Value? A Look at the ROI | Pro Found Roofing
 What is a Roofing Nail? The Right Type, Size, and Number for a Secure Roof
 What is a Roofing Nail Gun? Why Coil Nailers are Preferred for Speed and Safety
 How to Prevent Roof Damage from Overhanging Tree Branches