
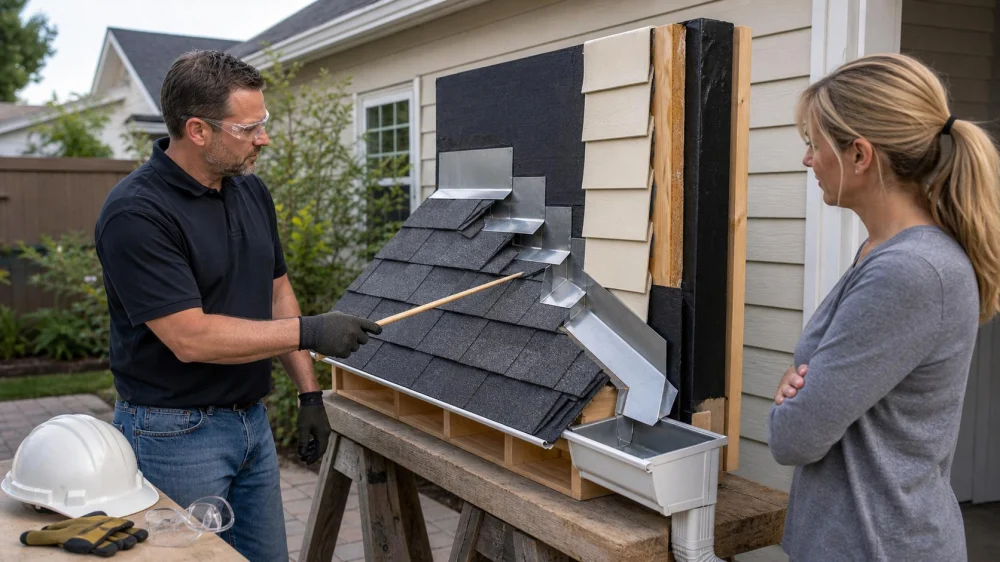
Roof-to-Wall Flashing: Define Siding and Step Details
Where a sloped roof meets a wall, water must move from roofing to flashing and back onto the roof surface without entering behind siding or masonry. This transition often spans two trades, so it deserves its own written detail. “Reuse flashing if possible” is not enough to define who opens the wall, what gets replaced, and how the finished assembly can be verified.
Quick answer
Identify every roof-to-wall intersection before bidding. Require a written detail for step flashing, kick-out flashing at the lower end, underlayment integration, counterflashing or wall water-resistive barrier, siding clearance, fasteners, and compatible sealants. Assign who removes and reinstalls siding, stucco, or masonry components. Photograph the layered work before wall finish and shingles conceal it.

JK Contractors / jk roofing
West BendOzaukee CountyWisconsin
3058 County Rd Y, West Bend, WI 53095, USA
Understand the layered water path
A roof-to-wall assembly should direct water in shingle fashion: each higher layer overlaps the drainage layer below. Roof covering alone cannot make the vertical wall intersection watertight. Water running down the wall or roof needs flashing that sends it outward without depending on a thick exposed bead of sealant.
The wall may include cladding, a drainage space, a water-resistive barrier, sheathing, windows, and other penetrations. The roof includes underlayment, shingles or another covering, deck, and edge details. The transition must connect these systems without creating a reverse lap.
Because much of the work becomes hidden, photographs and inspection timing matter. A finished strip of metal does not prove the layers behind it drain correctly.

SB Pro Roofing / sb pro roofing
Pinellas ParkPinellas CountyFlorida
6358 49th St N, Pinellas Park, FL 33781, USA
Separate step flashing and counterflashing
Step flashing uses individual pieces interwoven with courses of shingles along the sidewall. Each piece overlaps the one below so water returns to the roof surface. Continuous metal used alone at a shingle sidewall may not accommodate the same layered sequence.
Counterflashing or the wall’s water-resistive layer protects the upper edge of the step flashing so water cannot run behind it. Masonry may use flashing set into a joint or another designed termination; siding systems require integration behind the cladding.
At the bottom of a wall, kick-out flashing diverts water away from the wall and into the gutter or drainage path. It should project enough to prevent runoff from slipping behind cladding. Its exact shape and integration depend on the assembly.
Coordinate siding and wall finishes
Replacing sidewall flashing may require temporarily removing siding. Vinyl, fibre cement, wood, metal, stucco, stone veneer, and masonry each present different access and repair issues. Ask whether pieces can be removed intact, what happens if they break, and how colour or profile mismatch is handled.
Maintain the clearance required by the cladding and roofing manufacturers. Siding pressed against shingles can trap debris and moisture, block inspection, and make reroofing difficult. Exposed wood should not be left unprotected while trades wait for one another.
Assign a single coordinator even if a siding contractor, mason, or carpenter performs part of the work. The roof should not be declared complete with an unresolved wall opening or temporary tape hidden behind trim.
Write the detail into the scope
For each wall intersection, the contract should specify:
- location and approximate length;
- existing cladding and access method;
- whether old step flashing is removed or evaluated for reuse;
- new metal type, dimensions, finish, and compatibility;
- step-flashing sequence and fastener placement;
- kick-out flashing at the lower termination;
- underlayment and wall-barrier integration;
- counterflashing or termination method;
- siding removal, replacement allowance, clearance, and finish repair;
- photo, permit, and inspection checkpoints.
Include how hidden rot or missing wall barrier will be priced through a written change order. Do not let unexpected substrate damage turn into undocumented open-ended work.
Review the transition during work
Request wide and close photos after removal, after substrate repairs, after underlayment and wall-barrier preparation, during step flashing installation, at the kick-out, and before siding returns. Label the wall or elevation in the project record.
Ask the contractor to show that each step piece overlaps correctly, fasteners do not unnecessarily pin pieces in vulnerable locations, and the upper edge is protected by the wall assembly. Check that the kick-out actually directs water beyond the cladding face and toward an intended drainage area.
Sealant may be part of a tested detail, but it should not be the only strategy at a long roof-to-wall joint. Require the installed system to match local code, product instructions, and any approved project detail.
Record warning signs from the ground
Possible clues include staining below the lower end of the wall, peeling paint, swollen siding, moss or algae in a concentrated runoff path, missing or bent kick-out metal, debris packed into the joint, or recurring interior moisture near the intersection.
These signs do not identify the cause on their own. Gutters, windows, cladding, condensation, plumbing, and other roof details can create similar symptoms. Photograph the wider elevation, note weather and timing, and ask a qualified professional to trace the path.
Do not pry siding, lift shingles, push a hose into the joint, or climb a ladder to test it. Forced water can create a leak that normal rain would not.
Code, design, and safety limits
Roof-to-wall requirements vary with roof covering, wall cladding, slope, exposure, local code, manufacturer instructions, and building design. Stucco, adhered veneer, masonry, low-slope roofs, and complex additions may require a design professional or specialist trade.
This article is planning information, not an installation specification. Keep homeowners off roofs, ladders, scaffolds, and opened wall areas. Let qualified contractors coordinate fall protection, temporary weather protection, and trade access.
Frequently asked questions
Can old step flashing be reused?
Sometimes a contractor may determine it is serviceable and compatible, but reuse can limit inspection and correct integration. Define the evaluation and price alternative before work.
Is one long piece of metal the same as step flashing?
Not generally for an asphalt-shingle sidewall. Step flashing is layered with individual shingle courses; use the assembly required by code and the manufacturer.
Why must siding be removed?
Access may be needed to inspect the wall, protect the top of the flashing, integrate the water-resistive barrier, and maintain proper clearance.
Can caulk fix a roof-to-wall leak?
Sealant can support some approved details, but exposed caulk alone rarely replaces missing or incorrectly layered flashing. Diagnose the assembly first.
Next steps
Walk the property from the ground and mark every roof-to-wall intersection on the bid plan. Ask who owns the siding or masonry work and request a measurable flashing detail. Put hidden-condition pricing and photo checkpoints in the contract. Before the wall closes, verify the continuous water path from wall barrier to flashing to roof surface.



 Certified Roofing5.0 (9 reviews)
 RN Palmer Roofing4.0 (8 reviews)
 Coastline Roofing Company LLC4.0 (55 reviews)
 DM Roofing Siding & Windows5.0 (14 reviews)
 Eenigenburg Roofing4.0 (30 reviews)
 Alvarado General Roofing, Roofing Service in La Puente CA, Roofers in La Puente CA5.0 (9 reviews)
 The Best Roofing Materials for a Home in a Heavy Rainfall Climate
 Roof Replacement Cost Breakdown by Labor and Materials Explained
 Roof Replacement Permit Cost Explained: Fees, Factors, and What Homeowners Should Know
 Asphalt Shingles vs Metal Roofing: Pros, Cons, and Cost Comparison
 Cost to Replace Roof Soffit and Fascia: Complete Guide for Homeowners
 How to Clean Your Roof Without Damaging the Shingles' Fire Rating