
Roof Nail Pops: Warning Signs and Safe Next Steps
On this page
Quick answer
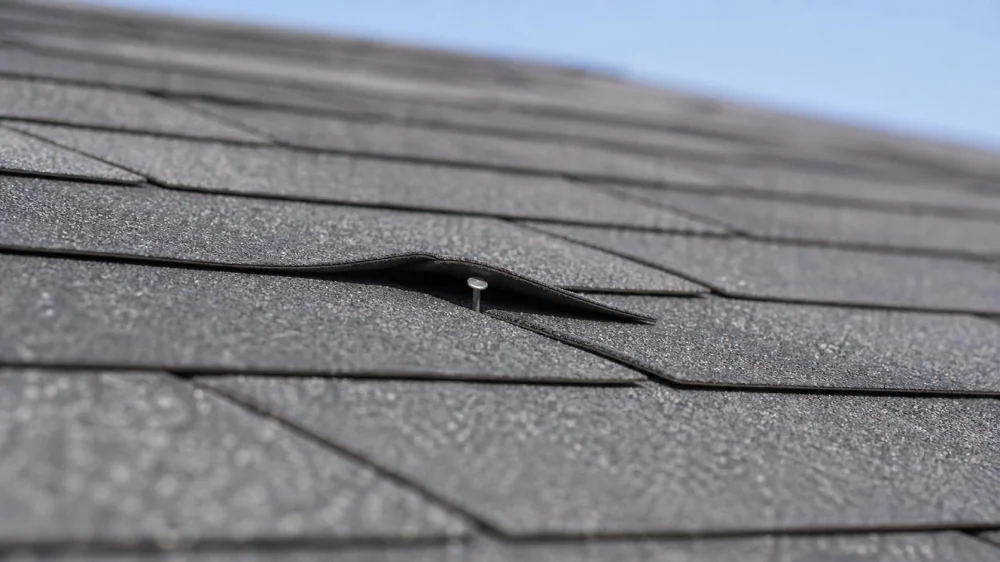
A roof nail pop occurs when a roofing fastener rises enough to lift, puncture, or distort the shingle above it. It can create a water-entry path, but the visible bump does not reveal the cause. Photograph the area from safe ground, check ceilings and attic access for moisture, and have a qualified roofer inspect the fastener, shingle, deck, nearby pattern, and installation details.

Gunner Roofing / gunner roofing
CromwellLower Connecticut River Valley Planning RegionConnecticut
700 Corporate Row, Cromwell, CT 06416, USA
What a roof nail pop is
“Nail pop” is a common term for a fastener that no longer sits as intended in a roof assembly. On an asphalt-shingle roof, it may appear as a small raised bump, a lifted tab, a round hole, a shiny fastener head, a cracked spot, or a shingle edge that does not lie flat.
Not every bump is a nail. A raised area can also involve debris beneath the shingle, an uneven deck seam, a backed-out screw in another roof component, blistering, impact, sealant, or surface distortion. Roofers need close inspection to distinguish these conditions.
A fastener may be visible because it was installed in an exposed location, because the covering shingle moved or broke, or because the fastener itself rose. Those are different problems and may require different repairs.

Rapid Response Roofing / rapid response roofing
East GreenvilleMontgomery CountyPennsylvania
408 State St, East Greenville, PA 18041, USA
Why roofing fasteners can rise
- Deck movement: Wood sheathing and framing can move with moisture, drying, temperature, loading, and building conditions.
- Fastener placement: A fastener outside the manufacturer's nailing zone, driven at an angle, or placed through an unsuitable area may not hold as designed.
- Driving depth: Underdriven fasteners can remain proud, while overdriven fasteners may cut through the shingle and reduce holding.
- Fastener selection: Length, shank, corrosion resistance, head, and compatibility must match the roof system and requirements.
- Deck condition: Damaged, delaminated, thin, decayed, or poorly supported sheathing may not retain fasteners reliably.
- Shingle or underlayment movement: Wind, thermal cycling, poor sealing, or installation details can transfer stress around a fastener.
- Workmanship or later traffic: Installation errors and foot traffic from later rooftop work can both contribute.
A nail pop does not automatically prove defective materials or poor workmanship. Evidence from the fastener, deck, layout, and surrounding roof is needed.
Signs homeowners may notice
From the ground or a safely accessible window, use binoculars or camera zoom to look for:
- Small isolated bumps that cast a shadow
- Shingle tabs lifted at one point
- Round holes, cracks, or exposed metal
- Lines of similar bumps along a course or deck seam
- Tabs that move or flap in wind
- Staining below the same roof area
Inside, note new ceiling spots, damp odour, peeling paint, softened drywall, wet insulation visible from safe attic access, or drips that appear after rain or snowmelt. Mark the indoor location on a simple floor plan because water may travel before becoming visible.
Do not climb onto the roof to confirm a small bump. Asphalt surfaces can be steep, brittle, hot, wet, icy, or damaged even when they look manageable.
Why simply hammering it down is not a repair plan
Driving the same fastener back into the same loosened hole may not restore holding. The shingle may already be punctured, cracked, or unsealed, and the deck beneath may be damaged. A hammer strike can also break a brittle shingle or create another exposed hole.
Generic caulk spread over the bump is not a durable diagnosis. It can hide the opening temporarily, interfere with shingle movement, collect debris, and complicate proper repair. Roofing products and sealing locations must be compatible with the manufacturer instructions and roof assembly.
A proper repair may require removing or replacing the affected fastener, choosing a new approved location, sealing the abandoned hole correctly, replacing damaged shingles, and correcting the reason the fastener rose. The exact method depends on access, material condition, deck, weather, and product requirements.
What a professional should inspect
- Confirm the defect. Determine whether the bump is a fastener, deck condition, blister, debris, or another issue.
- Map the pattern. Is it one location, one slope, a straight line, a repair area, or widespread?
- Inspect shingle condition. Check cracking, sealing, brittleness, granule condition, and ability to lift tabs without damage.
- Evaluate fasteners. Review type, length, angle, placement, driving depth, corrosion, and holding.
- Assess the deck. Look for moisture, decay, delamination, unsupported joints, movement, and thickness or material issues where accessible.
- Check related water paths. Inspect underlayment, flashing, penetrations, valleys, and interior evidence when relevant.
- Review roof conditions. Consider ventilation, insulation, air leakage, wind exposure, previous repairs, and rooftop equipment work without assuming any one cause.
- Document the repair. Provide photos, materials, method, limits, warranty effect, and any broader recommendation.
When several nail pops follow a repeatable pattern, a one-spot repair may not address the system condition. Ask how the proposed scope matches the observed distribution.
When to act quickly
Schedule prompt inspection when the fastener head or hole is exposed, shingles flap, several bumps appear after wind, indoor moisture is present, the roof was recently installed, or the same area was repaired before.
Seek urgent help for active water near electrical fixtures, a bulging ceiling, falling roofing material, structural sagging, or widespread wind lift. Keep occupants away from the affected interior and exterior areas.
For a newly installed roof or a possible warranty issue, notify the installer using the required process and preserve dated photographs. Avoid unauthorized roof work that could destroy evidence or affect coverage.
Limitations and evidence notes
This article reflects common asphalt-shingle inspection practice in the United States. A photograph cannot verify fastener type, deck holding, installation compliance, water entry, or repairability. Product instructions, approved details, site conditions, and physical inspection are stronger evidence.
Roofing codes, licensing, permits, and warranty procedures vary by state, municipality, product, building type, and project scope. Hire an appropriately qualified and insured professional and confirm current local requirements before work begins.
Frequently asked questions
Does one nail pop mean the roof is failing?
Not necessarily. One local defect may be repairable. Multiple fasteners in a pattern can indicate a broader installation, deck, movement, or material condition that needs more investigation.
Can a nail pop cause a roof leak?
Yes, especially if it creates an exposed hole, breaks the shingle, or lifts an area where wind-driven water can enter. Not every pop leaks immediately, so absence of an indoor stain does not prove it is harmless.
Can I see nail pops from the ground?
Some raised tabs and shadows are visible with zoom, but small defects can be missed or mistaken for other conditions. Use ground photos to request an inspection, not to confirm the repair.
Are nail pops covered by a roof warranty?
Coverage depends on cause and the terms of workmanship and manufacturer warranties. Preserve records, follow notice procedures, and let the responsible parties document the condition before unauthorized work.
Should the roofer replace the whole shingle?
That depends on brittleness, damage, seal condition, material availability, fastener location, deck, and product instructions. Ask the roofer to explain why the chosen method restores the water-shedding assembly.
Conclusion and next steps
Photograph suspected nail pops from safe ground, record weather and interior moisture, and collect installation and warranty documents. Do not hammer, caulk, or walk on the area. A qualified roofer should determine what the bump is, why it occurred, whether the pattern is local or widespread, and how the repair will restore both fastening and water shedding.

 Five Stars Quality Construction, Inc.4.0 (140 reviews)
 Portland Quality Roofing Inc5.0 (7 reviews)
 Nextop Roofing5.0 (43 reviews)
 Eden Roofing & General Contractors NYC4.0 (9 reviews)
 sjjsroofingcontractorscorp0.0 (0 reviews)
 Varni Roofing4.0 (53 reviews)
 Top Questions to Ask Before Hiring a Roofing Company: A Complete Guide
 Cost to Replace Roof After Fire Damage: Understanding the Expenses and Process
 Installing a Modified Bitumen Roof for a Low-Slope Garage: Step-by-Step Process
 Green Roofs: How They Work, Benefits, and Installation Considerations for Your Home
 The True Cost of Roof Replacement When You Have to Replace Rotted Rafters
 How to Tell If Your Roof Was Installed Properly