
- 1. Overview of TPO Roofing
- 2. Pre-Installation Steps for TPO Roof
- 3. Step-by-Step Process of Installing a TPO Roof
- 4. Benefits of TPO Roofing on Commercial and Flat Roofs
- 5. Real-Life Case Study: Successful TPO Roof Installation
1. Overview of TPO Roofing
TPO (Thermoplastic Olefin) roofing is a popular choice for both commercial buildings and flat residential roofs due to its durability, energy efficiency, and cost-effectiveness. TPO roofing systems are made from a single-ply membrane that is heat-welded at the seams, offering exceptional protection against weather elements, UV radiation, and heat buildup. The reflective surface of TPO helps reduce energy consumption by reflecting sunlight, making it an eco-friendly option for flat and low-slope roofs.
Victors Home Solutions / victors roofing
2722 E Michigan Ave suite 239, Lansing, MI 48912, USA
2. Pre-Installation Steps for TPO Roof
Before beginning the installation of a TPO roof, certain preparation steps are necessary to ensure a smooth process and a high-quality finish. Here's a breakdown of the pre-installation steps:
- Inspection of the Existing Roof: A thorough inspection of the existing roof is crucial to identify any underlying issues, such as damage or poor drainage. It helps determine if the current roofing structure can support a TPO membrane.
- Surface Preparation: The surface of the roof must be clean and smooth for the TPO membrane to adhere properly. Any debris, dirt, or old roofing materials must be removed.
- Measuring and Cutting Materials: Accurate measurements of the roof are necessary to ensure the TPO membrane fits correctly. The material is then cut to size to prevent waste and ensure a snug fit.
- Gathering the Necessary Tools: Make sure you have all the tools and equipment required for installation, including a hot air welder for sealing seams, a utility knife, and a ladder or scaffolding for access.
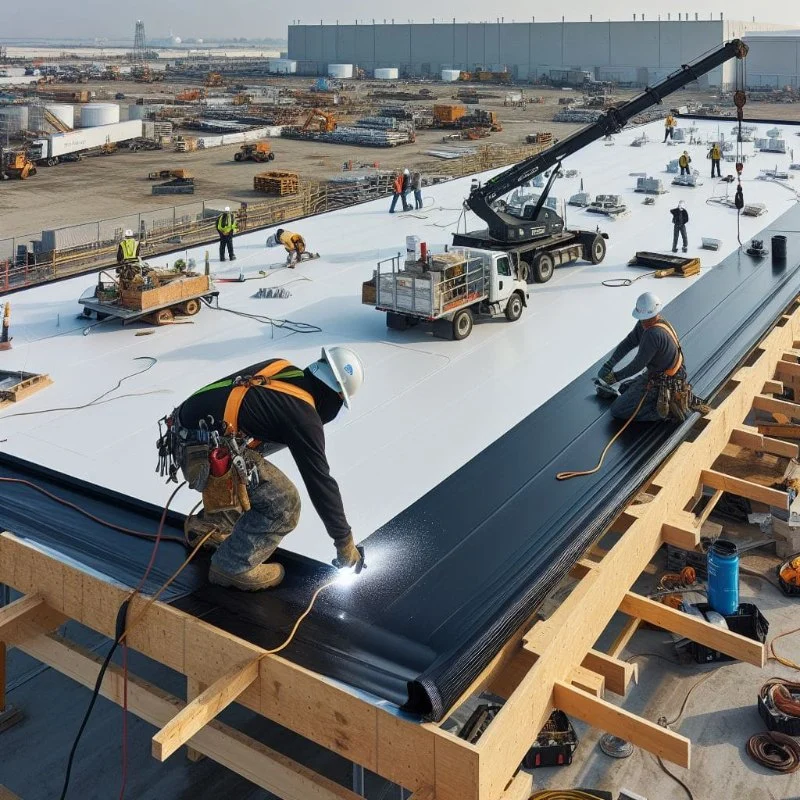
3. Step-by-Step Process of Installing a TPO Roof
Once the preparation steps are completed, the actual installation of the TPO roofing system can begin. Here’s a detailed breakdown of the installation process:
- Step 1: Laying the TPO Membrane: Begin by unrolling the TPO membrane across the roof. The membrane should be laid out evenly with the edges aligned, ensuring no wrinkles or folds.
- Step 2: Attaching the Membrane: The TPO membrane can be mechanically fastened to the roof deck or adhered using adhesive. In some cases, the membrane is ballasted with gravel or other materials to secure it in place.
- Step 3: Sealing the Seams: The most critical part of the installation process is sealing the seams. Using a hot air welder, the seams of the TPO membrane are heat-welded together. This ensures a waterproof seal and enhances the durability of the roof.
- Step 4: Flashing and Edge Detailing: Flashing around roof penetrations (such as vents or chimneys) is necessary to prevent water infiltration. The edges of the TPO membrane are then secured with flashing and sealed tightly to ensure no gaps.
- Step 5: Final Inspection: After the installation is complete, a final inspection should be conducted to check for any defects or areas that need further attention. This step ensures that the TPO roof is installed to the highest standard.
4. Benefits of TPO Roofing on Commercial and Flat Roofs
TPO roofing offers a variety of advantages, making it an ideal choice for commercial buildings and flat home roofs. Some of the key benefits include:
- Energy Efficiency: TPO’s reflective surface helps reduce energy consumption by keeping the interior of the building cooler, especially during hot weather. This can lead to lower cooling costs for businesses and homeowners.
- Durability: TPO roofs are highly durable and resistant to UV radiation, chemicals, and harsh weather conditions. This makes them a long-lasting solution for flat roofs.
- Cost-Effective: TPO roofing systems are more affordable compared to other commercial roofing materials like EPDM or PVC, making them a budget-friendly option for property owners.
- Eco-Friendly: TPO roofs are recyclable and contribute to sustainability efforts. The energy efficiency of the material also helps reduce the building’s carbon footprint.
- Low Maintenance: TPO roofing requires minimal maintenance once installed. The seamless design reduces the risk of leaks, and the membrane’s durability ensures long-term protection with minimal upkeep.
5. Real-Life Case Study: Successful TPO Roof Installation
Let’s look at the case of a commercial building in Chicago that needed a new roof due to frequent leaks and deteriorating materials. After consulting with roofing experts, the property owner decided to install a TPO roofing system to replace the old one. The installation took just three days, and the team followed the standard TPO roof installation process. Since the installation, the building has experienced no leaks, and energy costs have decreased by 15%. The TPO roof’s durability and energy efficiency have proven to be a great investment for the building owner, with minimal maintenance required so far.


 Near Me Roofing Texas5.0 (5 reviews)
 Zimmerman Re-Roofing0.0 (0 reviews)
 Kennedy Construction & Roofing 419-747-Roof4.0 (48 reviews)
 Vincent Exteriors5.0 (295 reviews)
 M.Y. ROOFING LLC0.0 (0 reviews)
 Innovative Skylights & Attics4.0 (92 reviews)
 The Best Time to Schedule a Roof Replacement to Avoid Contractor Backlogs
 How to Safely Remove Moss and Algae from Your Roof - Step-by-Step Guide
 How Long Does Roof Installation Take? Complete Timeline Guide for Homeowners
 How to Inspect Your Roof for Damage After a Hailstorm | Pro Found Roofing
 Common Mistakes Homeowners Make During Roof Repairs
 The Benefits of a Green Roof for Sound Insulation in Noisy Urban Areas