

Understanding Roof Flashing: What It Is and Why It Matters
- 1 - What is Roof Flashing?
- 2 - Types of Roof Flashing
- 3 - Why Roof Flashing Is Important
- 4 - How to Install Roof Flashing
- 5 - Common Roof Flashing Problems and How to Fix Them
1 - What is Roof Flashing?
Roof flashing is a crucial component of your roof system, designed to prevent water from seeping into vulnerable areas. It is made of durable materials, such as metal, and is typically installed at joints, intersections, and edges of the roof to guide water away from areas that are prone to leaks. These areas include valleys, chimneys, skylights, vents, and around the roof’s edges.
Flashing is installed to ensure that water doesn't penetrate these areas, preventing damage to the roof structure and the interior of the house. Without flashing, water can seep through the roof, leading to mold, rot, and significant water damage.

JK Contractors / jk roofing
West BendOzaukee CountyWisconsin
3058 County Rd Y, West Bend, WI 53095, USA
2 - Types of Roof Flashing
There are several types of roof flashing, each designed for different parts of the roof. The main types include:
- Continuous Flashing: This type of flashing runs along a continuous edge or seam, often used around chimneys, walls, or the roof’s edges. It’s ideal for providing a watertight seal along longer stretches.
- Step Flashing: Used primarily in areas where the roof meets a vertical surface, such as a wall, step flashing is installed in layers to direct water away from the joint. Each piece of flashing overlaps the one beneath it, forming a stair-step pattern.
- Valley Flashing: This flashing is used in roof valleys, where two roof planes meet. The valley is a natural channel for water, and valley flashing is designed to direct it away from the roof and into the gutters.
- Counter Flashing: Installed over existing flashing to provide additional protection, counter flashing is commonly used around chimneys. It’s typically used in conjunction with step flashing for a double layer of defense against water infiltration.
3 - Why Roof Flashing Is Important
Roof flashing is one of the most important elements of a roof system because it protects your home from water damage. Here's why roof flashing is crucial:
- Prevents Water Damage: Flashing helps divert water away from vulnerable roof areas, preventing leaks and water intrusion that could cause significant damage to your home’s structure.
- Prevents Mold and Mildew: Without proper flashing, water can accumulate in areas like the attic or ceilings, promoting mold growth. Flashing helps to prevent these moisture-related issues, which can be hazardous to your health and costly to repair.
- Increases Roof Lifespan: By preventing water from infiltrating your roof, flashing helps protect your roof’s materials, which in turn extends the lifespan of your roof and reduces the need for frequent repairs or replacements.
- Enhances Energy Efficiency: Properly installed flashing also improves your roof’s ability to maintain temperature control, reducing drafts and moisture in the home, which can contribute to energy savings.
4 - How to Install Roof Flashing
Installing roof flashing requires some skill and attention to detail. Here's an overview of the process to install flashing effectively:

Absolute Roofing / absolute roofing
TimoniumBaltimore CountyMaryland
22 W Padonia Rd # B229, Timonium, MD 21093, USA
Step 1: Assess the Roof Area
Before installing flashing, identify the areas of the roof that require it, such as around chimneys, vents, skylights, or roof valleys. Inspect these areas for any signs of water damage, as this could indicate the need for immediate flashing repairs.
Step 2: Measure and Cut the Flashing
Once you’ve identified the areas, measure the dimensions of the flashing material you need. Using a metal cutting tool, carefully cut the flashing to the required size, ensuring it fits snugly against the roof’s edges and joints.
Step 3: Install the Flashing
For step flashing, place each piece of flashing along the roof’s edge, making sure it overlaps the one beneath it. For continuous flashing, attach it along the seams, ensuring it’s securely fastened with roofing nails or screws. Always use a sealant between the flashing and the roof to ensure a watertight bond.
Step 4: Inspect for Gaps
After installation, thoroughly inspect the flashing for any gaps or loose sections. These can allow water to enter, so it’s essential to fix any issues before they lead to leaks.
5 - Common Roof Flashing Problems and How to Fix Them
Over time, roof flashing can become damaged or worn, leading to leaks and water intrusion. Here are some common flashing problems and how to address them:
- Loose or Missing Flashing: Over time, flashing may loosen or become dislodged due to weather exposure. To fix this, re-secure or replace the damaged flashing. Ensure that it is properly sealed to prevent water from slipping through the gaps.
- Corroded Flashing: Flashing made of metal, such as aluminum or copper, can corrode due to exposure to the elements. If you notice rust or corrosion, replace the affected sections to maintain proper protection against water damage.
- Improperly Installed Flashing: Flashing that isn’t installed correctly can allow water to seep in, leading to leaks. If you notice water damage despite having flashing in place, it may be time to call a professional to re-install it properly.
Regular inspection of your roof flashing is essential to avoid these issues. If you notice any problems, it’s a good idea to address them quickly to prevent further damage to your roof and home. For expert advice and roofing services, visit Pro Found Roofing for the best solutions to keep your roof in top condition.


 Mr. Roofer | Roofing & Construction4.0 (190 reviews)
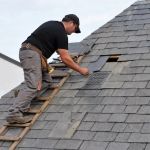 R&D Roofing Durham Pros1.0 (1 reviews)
 Care Roofing, Inc.5.0 (9 reviews)
 DEC Construction, Inc.5.0 (81 reviews)
 Top Roofing & Siding5.0 (1 reviews)
 Showplace Roofing5.0 (51 reviews)
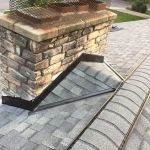 Why You Need a Roofing Cricket Behind a Large Chimney to Prevent Damage
 Preparing Your Roof for a Hurricane: Steps to Take Before the Storm Hits | Pro Found Roofing
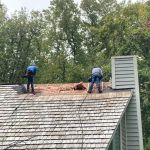 How to Finance a New Roof Without Breaking the Bank
 How to Install Step Flashing on a Roof to Wall Intersection
 The Signs of a Pest Infiltration Through Your Roof: Droppings and Noises
 How to Choose a Roof Color That Won't Go Out of Style for Resale | Pro Found Roofing