

1. Why You Need a Drip Edge on Your Roof
A drip edge is an essential roofing component that helps to direct water away from the roof and prevent water damage to the underlying structure. If your roof has never had a drip edge, it’s important to understand its role in safeguarding your roof and home. Installing a drip edge can significantly extend the lifespan of your roof and prevent costly repairs caused by water damage, especially around the edges of the roof where water is most likely to seep in.

Holden Roofing (Houston Corporate) / holden roofing
RosenbergFort Bend CountyTexas
2128 1st St, Rosenberg, TX 77471, USA
2. What is a Drip Edge?
A drip edge is a metal strip that is installed along the edges of your roof, under the first row of shingles. It helps water flow off the roof, preventing it from seeping under the shingles and into the roof deck. Drip edges are commonly made of aluminum, steel, or copper and come in a variety of styles and sizes. The two main components of a drip edge system are:
- The eave drip edge: This part directs water away from the roof and into the gutters.
- The rake drip edge: This part protects the roof’s side edges and prevents water from running under the shingles.
3. How to Install a Drip Edge on a Roof That Never Had One
Installing a drip edge on a roof that never had one before may seem like a daunting task, but it’s a manageable home improvement project that can greatly enhance your roof’s performance. Here’s a step-by-step guide to help you install a drip edge:

SB Pro Roofing / sb pro roofing
Pinellas ParkPinellas CountyFlorida
6358 49th St N, Pinellas Park, FL 33781, USA
3.1 Gather the Necessary Materials
Before starting, make sure you have all the required materials and tools. You’ll need the following:
- Drip edge (measured to fit your roof's dimensions)
- Roofing nails
- Hammer or nail gun
- Utility knife
- Measuring tape
- Roofing adhesive (optional)
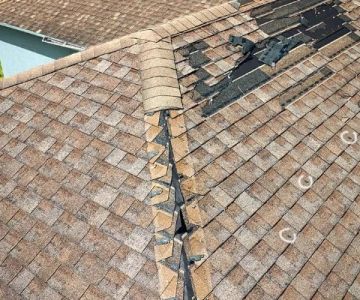
3.2 Remove Old Roofing Material (if applicable)
If you're installing a drip edge on a roof that already has shingles, you will need to remove the first row of shingles along the edges. This is necessary for the drip edge to be installed properly beneath the shingles. Be careful when removing the shingles to avoid damaging the underlying roofing materials.
3.3 Measure and Cut the Drip Edge
Next, measure the length of the roof edges where you will be installing the drip edge. Use a utility knife to cut the drip edge to the required length, ensuring that each piece fits snugly along the roof’s eaves and rakes.
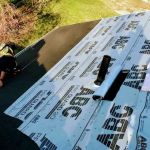
3.4 Install the Drip Edge
Place the drip edge along the edge of the roof, ensuring that it extends slightly over the edge of the roof, directing water into the gutters. Use roofing nails to secure the drip edge to the roof, spacing them approximately 12 inches apart. If you're installing the drip edge on a sloped roof, make sure the edges are angled downward so water will flow off the roof efficiently.
3.5 Install the First Row of Shingles
Once the drip edge is securely in place, you can begin installing the first row of shingles. The shingles should overlap the drip edge to create a seamless flow of water off the roof. Continue to install the rest of the shingles, ensuring each row is properly aligned with the edge of the drip edge.
3.6 Seal and Finish
For added protection, apply roofing adhesive along the edges of the drip edge and the first row of shingles. This helps prevent wind from lifting the shingles and ensures a tight seal. Once all shingles are installed, inspect the entire roof to ensure the drip edge is securely attached and water can flow freely into the gutters.
4. Maintenance Tips for Drip Edges
Once your drip edge is installed, it’s important to maintain it to ensure its longevity. Here are some maintenance tips:
4.1 Clean Gutters Regularly
Since the primary purpose of a drip edge is to guide water into the gutters, it’s essential to keep your gutters clean and free of debris. Clogged gutters can cause water to overflow, defeating the purpose of the drip edge and potentially damaging your roof.
4.2 Inspect for Damage
Regularly inspect the drip edge for any signs of wear or damage, such as rust, corrosion, or dents. If you notice any issues, replace the damaged section of the drip edge to maintain your roof's protection.
5. When to Call a Professional
While installing a drip edge can be a DIY project, it may not be suitable for everyone. If you’re uncomfortable working on your roof or if your roof has complex features, it’s best to call a professional roofing contractor. A roofing expert can ensure that the drip edge is installed properly and that your roof is fully protected from water damage.
6. Conclusion
Installing a drip edge on a roof that never had one before is an effective way to prevent water damage and protect your home. By following the proper installation steps and performing regular maintenance, you can ensure that your roof stays in good condition for years to come. If you need expert advice or professional installation services, visit Pro Found Roofing for assistance with all your roofing needs.


 Pro Builders Home Improvement5.0 (5 reviews)
 Sealy Trinbago Inc4.0 (12 reviews)
 Done Rite Gutters, LLC0.0 (0 reviews)
 Energy Advantage Roofing & Solar4.0 (253 reviews)
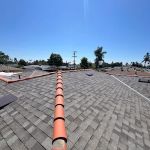 Mister Roofing INC5.0 (3 reviews)
 Evolve Construction & Restoration KY5.0 (74 reviews)
 The Benefits of a Cool Roof for Urban Areas Reducing the Heat Island Effect
 The Signs of Ice Dam Damage on Your Roof and in Your Attic
 Does a New Roof Increase Your Home's Resale Value? A Look at the ROI | Pro Found Roofing
 The Best Roofing Nails for the Job: Material, Length, and Shank Type Explained
 The Best Time to Schedule a Roof Replacement to Avoid Contractor Backlogs
 How to Finance a New Roof Without Breaking the Bank