
- 1 - Benefits of Solar Reflective Tile Roofs
- 2 - Materials Needed for Installation
- 3 - Steps to Install a Solar Reflective Tile Roof
- 4 - Maintaining Your Solar Reflective Roof
- 5 - When to Call a Professional for Roof Installation
1 - Benefits of Solar Reflective Tile Roofs
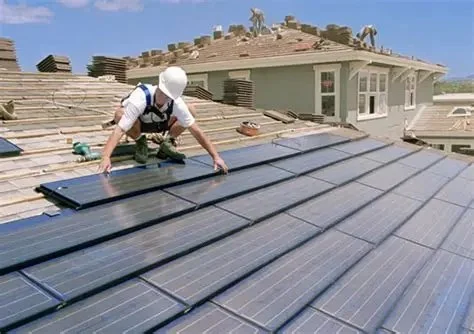
Installing a solar reflective tile roof is one of the most effective ways to improve energy efficiency, especially in hot climates. These roofs are designed to reflect more sunlight and absorb less heat, which can significantly reduce the temperature inside your home. By reflecting heat away from your roof, solar reflective tiles help lower cooling costs, increase comfort, and contribute to a greener environment by reducing the need for air conditioning. Additionally, they often have a longer lifespan compared to traditional roofing materials, making them a smart long-term investment.

Holden Roofing (Houston Corporate) / holden roofing
RosenbergFort Bend CountyTexas
2128 1st St, Rosenberg, TX 77471, USA
2 - Materials Needed for Installation
Before you start the installation process, it’s essential to have the right materials and tools. Here’s a list of what you will need:
- Solar reflective tiles (make sure they are designed for your climate)
- Roofing underlayment (such as synthetic underlayment for added protection)
- Roof adhesive or fasteners
- Roofing nails and a hammer
- Measuring tape and level
- Roofing sealant
- Safety gear (gloves, ladder, non-slip shoes)
It’s also important to choose solar reflective tiles that are specifically designed for the harsh conditions of hot climates, ensuring they will offer maximum efficiency and durability.
Victors Home Solutions / victors roofing
2722 E Michigan Ave suite 239, Lansing, MI 48912, USA
3 - Steps to Install a Solar Reflective Tile Roof
Follow these steps to install your solar reflective tile roof correctly:
- Step 1: Prepare the Roof - Before installing the tiles, ensure that the roof is clean and free of any debris. Check the structure for damage, and make necessary repairs to avoid complications during installation.
- Step 2: Install the Underlayment - Lay down roofing underlayment to protect the roof deck from water infiltration. This layer acts as a barrier against leaks, ensuring that your new roof performs well over time.
- Step 3: Install the First Row of Tiles - Start at the edge of the roof and work your way across, making sure the tiles are properly aligned. Use roofing nails or fasteners to secure the tiles in place.
- Step 4: Continue Installing Tiles - Continue installing the tiles row by row. Ensure that each row overlaps the one below it to create a secure, weather-tight seal.
- Step 5: Install Ridge Caps - Once you’ve covered the entire roof with tiles, finish the installation by securing ridge caps at the peaks of the roof for added protection against wind and rain.
Throughout the installation process, make sure to double-check your measurements and alignments. This will ensure the roof is installed properly and performs as expected.
4 - Maintaining Your Solar Reflective Roof
To keep your solar reflective roof in top condition, regular maintenance is essential. Here are a few tips:
- Clean the tiles regularly: Dirt and debris can build up on the surface of the tiles, reducing their reflective properties. Use a soft brush or garden hose to clean the tiles.
- Check for damage: Inspect the roof for any cracked or missing tiles, and replace them immediately to avoid leaks.
- Inspect the flashing and seals: Ensure that the flashing around chimneys, vents, and other protrusions is intact and properly sealed.
By maintaining your solar reflective roof regularly, you’ll maximize its lifespan and energy-saving benefits.
5 - When to Call a Professional for Roof Installation
While DIY installation is an option for experienced homeowners, roof installation can be dangerous and complex. If you’re not comfortable working at heights or lack the necessary skills, it’s best to call a professional roofing contractor. A professional can ensure that the roof is installed correctly and safely, saving you time, effort, and potential mistakes.
Additionally, if your roof is large or has complex features, a professional installation will provide peace of mind knowing that everything is done according to local building codes and industry standards.
Installing a solar reflective tile roof is a significant investment that pays off in terms of energy savings and increased home comfort. By following the proper steps, using quality materials, and maintaining your roof regularly, you can enjoy the benefits of a cooler home and a longer-lasting roof. For all your roofing needs, including solar reflective tile roofs, visit Pro Found Roofing for expert services and quality products.


 Hastings Roofing Inc4.0 (32 reviews)
 Best Roofing LA5.0 (20 reviews)
 PRO MASTER CONSTRUCTION NJ LLC5.0 (16 reviews)
 Darcy Roofing LLC4.0 (5 reviews)
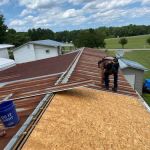 Rockwell Roofing5.0 (4 reviews)
 Glick's Exteriors4.0 (25 reviews)
 The Impact of Shade from Solar Panels on Moss Growth Underneath Them
 Understanding Roof Flashing: What It Is and Why It Matters for U.S. Homes
 What is a Roofing Nail? The Right Type, Size, and Number for a Secure Roof
 How to Choose Between TPO and PVC Roofing | Expert Roofing Guide
 How to Get a Free Roof Inspection: What’s Included and What’s Not
 What is a Roofing Warranty? Understanding Manufacturer vs. Contractor Warranties