
What is a Roofing Cricket? How to Install One on an Existing Chimney
- 1. What is a Roofing Cricket?
- 2. Why Are Roofing Crickets Important?
- 3. How to Install a Roofing Cricket on an Existing Chimney
- 4. Common Mistakes to Avoid When Installing a Cricket
- 5. Roofing Cricket Maintenance Tips
1. What is a Roofing Cricket?
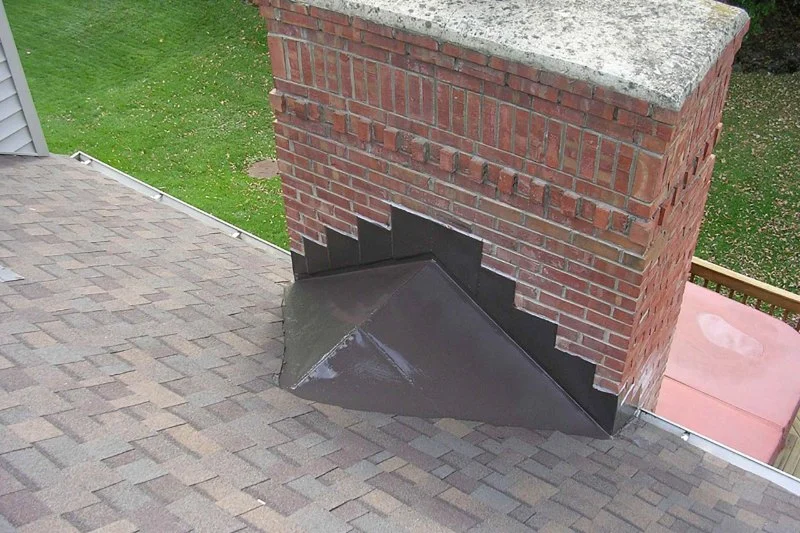
A roofing cricket, sometimes called a "chimney saddle," is a small, peaked structure built behind a chimney or other roof protrusion. Its primary purpose is to divert water around the chimney to prevent water from collecting and seeping under the roof or chimney base. A cricket is essentially an additional section of roofing that redirects water flow, helping to protect the home’s roof and foundation from water damage.

Holden Roofing (Houston Corporate) / holden roofing
RosenbergFort Bend CountyTexas
2128 1st St, Rosenberg, TX 77471, USA
1.1 Purpose of a Cricket
The key function of a roofing cricket is to prevent water from accumulating around a chimney. Without a cricket, water can pool in low spots or behind a chimney, which increases the risk of leaks and damage to both the roof and the chimney structure. By redirecting water around the chimney, crickets help ensure proper drainage and extend the lifespan of both the roof and chimney.
Victors Home Solutions / victors roofing
2722 E Michigan Ave suite 239, Lansing, MI 48912, USA
2. Why Are Roofing Crickets Important?
Roofing crickets are crucial for effective water management on sloped roofs. Without them, water can easily collect around chimneys, leading to leaks and long-term damage. Here’s why roofing crickets are important:
2.1 Preventing Water Damage
Water that collects around a chimney can seep underneath the shingles, leading to roof leaks, mold growth, and rotting wood. This type of water infiltration can cause severe damage to the roof structure, the ceiling, and even the foundation of the home. A properly installed cricket helps keep water away from these vulnerable areas.
2.2 Enhancing Roof Longevity
By ensuring proper water runoff, a cricket helps protect roofing materials from the damaging effects of constant water exposure. It prevents moisture from accumulating, which can cause shingles to deteriorate prematurely. This means the roof will last longer and require fewer repairs over time.
3. How to Install a Roofing Cricket on an Existing Chimney
Installing a roofing cricket on an existing chimney requires a few critical steps. While this project can be tackled by experienced DIYers, it’s always a good idea to hire a professional roofer for optimal results. Here’s a step-by-step guide to installing a roofing cricket:
3.1 Step 1: Assess the Chimney and Roof
Before installation, it’s important to assess the chimney and surrounding roof area. Check for any existing issues, such as damaged shingles, flashing, or leaks, that might need to be repaired first. The size of the cricket will depend on the chimney’s size, the roof slope, and the amount of water runoff you need to manage.
3.2 Step 2: Build the Cricket Frame
The cricket frame is typically constructed using wood or metal. Start by measuring the area behind the chimney where the cricket will sit. Construct a peaked frame that is sloped in such a way that water will flow around the chimney. The slope should generally be around 45 degrees, but this can vary depending on your roof’s pitch.
3.3 Step 3: Install Waterproofing Underlayment
Once the frame is in place, you’ll need to install a waterproofing underlayment over the cricket structure. This will prevent water from seeping into the roofing materials underneath. Make sure the underlayment is properly sealed along the edges to ensure no gaps where water can enter.
3.4 Step 4: Install Roofing Materials
With the underlayment in place, you can now install the same roofing material used on the rest of the roof (shingles, metal panels, etc.) over the cricket. Make sure the roofing materials are securely fastened and that all seams are properly sealed to ensure a watertight installation.
3.5 Step 5: Install Flashing
Flashings should be installed around the edges of the cricket to seal the junction between the chimney and the roof. The flashing directs water around the cricket and prevents leaks. Properly installed flashing is essential for the cricket to function as intended.
4. Common Mistakes to Avoid When Installing a Cricket
While installing a cricket is a great way to protect your roof, there are some common mistakes to watch out for:
4.1 Incorrect Slope
One of the most common mistakes is not giving the cricket the right slope. If the slope is too shallow, water will not flow off efficiently and may pool, causing damage. A slope that’s too steep may not redirect water properly either, leading to uneven runoff.
4.2 Inadequate Flashing
Failing to properly install flashing around the cricket can lead to leaks. Flashing should be installed snugly and sealed correctly to prevent water from seeping underneath.
4.3 Poor Sealing of Joints
Any gaps between the cricket and roofing materials or between sections of flashing can allow water to enter and cause damage. Make sure all joints are properly sealed with roofing cement or other suitable sealants.
5. Roofing Cricket Maintenance Tips
To ensure that your roofing cricket continues to function effectively, regular maintenance is essential. Here are some tips:
5.1 Clean Gutters and Downspouts
Ensure your gutters and downspouts are clear of debris so that water can flow freely from the cricket and off the roof. Clogged gutters can cause water to back up, negating the benefits of your cricket.
5.2 Inspect for Damage
Regularly inspect your cricket and flashing for signs of damage or wear. If any part of the cricket becomes loose or if the flashing is compromised, address the issue immediately to prevent leaks and water damage.
For more expert advice or roofing services, visit Pro Found Roofing to find the best materials and professionals to help with your roofing needs.


 Hastings Roofing Inc4.0 (32 reviews)
 Best Roofing LA5.0 (20 reviews)
 PRO MASTER CONSTRUCTION NJ LLC5.0 (16 reviews)
 Darcy Roofing LLC4.0 (5 reviews)
 Rockwell Roofing5.0 (4 reviews)
 Glick's Exteriors4.0 (25 reviews)
 The Impact of Shade from Solar Panels on Moss Growth Underneath Them
 Understanding Roof Flashing: What It Is and Why It Matters for U.S. Homes
 What is a Roofing Nail? The Right Type, Size, and Number for a Secure Roof
 How to Choose Between TPO and PVC Roofing | Expert Roofing Guide
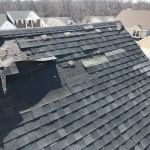 How to Get a Free Roof Inspection: What’s Included and What’s Not
 What is a Roofing Warranty? Understanding Manufacturer vs. Contractor Warranties